|
 WMI Explorer is an auxiliary application for HostMonitor, however it can be used independently as well.
WMI Explorer is included into Advanced Host Monitor package and can also be downloaded separately at the download page.
WMI is an acronym for Windows Management Instrumentation. WMI is the Microsoft's implementation of Web-Based Enterprise Management (WBEM) - a new management technology that allows software to monitor and control managed resources throughout the network.
Such managed resources include hard drives, file systems, settings of operating system, processes, services, shares, registry settings, networking components, event logs, users, groups, etc.
WMI allows monitoring of performance counters as well. Microsoft applications such as Exchange and SQL Server have WMI built-in.
Many non-Microsoft applications utilize WMI and thus they could be monitored using Advanced Host Monitor as well.
WMI is already built into Windows 2000 or above, and can be installed on any other 32-bit Windows system.
See also:
WMI Explorer
Explorer allows you to
- Explore the full set of WMI management classes, objects and their properties
- Browse through objects and settings on remote machines
- Execute any WQL query and view the result set
WMI Explorer can be started as an independent application or it can be launched by HostMonitor to tune up a WMI test.
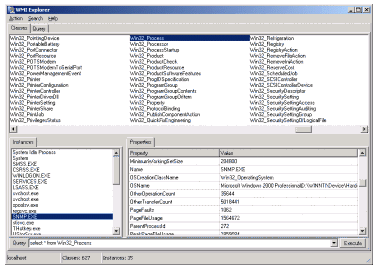
Once you have started WMI Explorer, you will be presented with two ways to explore a machine's objects:
The Classes (browser) view*

This view displays full set of classes within the specified namespace** (on local or remote machine), child objects and their properties.
Top portion of the main window shows all classes available on the system. In order to quickly find a class you may use "Search" menu.
Menu item "Find" searches (using the name) for the specified class. Menu item "Search again" looks for the next suitable entry.
If the search option "Match whole word only" is disabled, the search string might be found within longer words.
E.g. consecutive searches for the string "_Process" will find CIM_Process, CIM_ProcessExecutable, CIM_Processor, CIM_ProcessThread, Win32_Process and Win32_Processor items.
Instances
The Instances panel is located in the bottom-left portion of the main window.
Every time you click on a class in Classes panel, WMI Explorer queries Windows and retrieves all instances (objects) of the selected class.
Please note: some classes have many instances, retrieving of information about them may require a lot of time and system resources.
That is why WMI Explorer requests the target system in the background using dedicated thread.
This allows the user to check properties or switch to another class while the request is still in progress.
When request is completed, explorer shows the number of instances in the status line (if you see "Requesting instances..." in the status line, it means explorer have not yet finished retrieving the information).
Properties
The Properties panel is located in the bottom-right portion of the main window.
Every time you click on a class in Classes panel, WMI Explorer queries Windows to retrieve the list of properties of the selected class.
Even if there are no instances of the class, you will be able to see the list of its properties.
To view the property value for specific object, simply click the mouse on the object's instance in Instances panel.
Note: If object property represents one-dimensional array with 4 or less elements, WMI Explorer will display array elements.
If object property represents one-dimensional array with 5 or more elements, explorer will offer "Copy array values" popup menu item, it copies up to 512 elements of array into clipboard.
Methods
Here WMI Explorer can display methods of the selected class, also it shows parameters of each method.
Popup menu allows you to copy method description into clipboard; sort methods alphabetically.
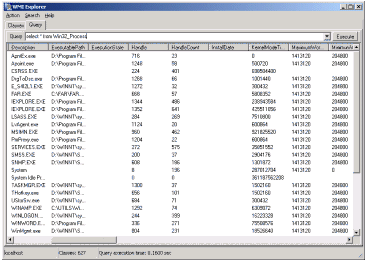
The Query view*
 The Query View gives you the capability to run standard WMI Query Language (WQL) queries; each instance that's returned is listed in the Results window.
- E.g. if you want to monitor the number of handles used by all running instances of the Internet Explorer, use the query like this:
SELECT HandleCount FROM Win32_Process WHERE name='iexplore.exe'
- If you need to monitor the number of processes which use more than 10 threads, use the following query:
SELECT ThreadCount FROM Win32_Process WHERE ThreadCount>10
- The query: SELECT * FROM Win32_Service WHERE Started=0 AND StartMode="Auto"
shows all services which have not started and have the start mode configured to "Automatic".
Menu "File"->"Save query result as" allows you to store query results into file using HTM, CSV or TSV file formats.
Query window is an invaluable resource for those who know where to look for something but need to see what exactly is returned by Windows API to HostMonitor.
If you are running HostMonitor and you already have configured some "WMI" test items, you may click the right mouse button on the test item and choose "Explore WMI" item from the popup menu.
When you do so, HostMonitor will start WMI Explorer in the Query mode, passing the query and information about the target host (such as the hostname, name space, login, etc) to the explorer.
This allows you to check quickly hardware and software parameters on the target system and instantly see what is going on (e.g. why the test item has been failed).
*To switch between views, click on their respective tabs at the top of the main window. You can do it at anytime since views are absolutely independent.
Connecting to remote host
WMI Explorer allows you to request both local (the system where explorer is running) and remote systems.
To connect to the remote system you may use GUI or command line parameters.
GUI:
If you already have started explorer and you need to connect to another system, use menu "Action" -> "Connect to host/namespace".
In the connection dialog you should specify the hostname and WMI name space** (default is root\cimv2); optionally you may provide the login name and password.
Also you may set authentication level using one of the following options:
- Default
Tells DCOM to choose the authentication level by using its normal security blanket negotiation (note: it will never choose an authentication level of None).
- None
No authentication is performed during the communication between client and server. All security settings are ignored.
- Connect
The normal authentication handshake occurs between the client and server, and a session key is established but that key is never used for communication between the client and server. All communication after the handshake is insecure.
- Call
Only the headers of the beginning of each call are signed. The rest of the data exchanged between the client and server is neither signed nor encrypted. Most SSPs do not support this authentication level and silently promote it to Packet.
- Packet
The header of each packet is signed but not encrypted. The packets themselves are not signed or encrypted.
- Packet Integrity
Each packet of data is signed in its entirety but is not encrypted. Because all of the data is signed by the sender, the recipient can be certain that none of the data has been tampered with during transit.
- Packet Privacy
Each data packet is signed and encrypted. This helps protect the entire communication between the client and server.
Command line:
You may specify connection parameters in command line so that WMI Explorer connects to specified system right after startup.
Format of the command line:
>wmiexplorer.exe [-host:<hostname>] [-namespace:<namespace>] [-user:<username>] [-pswd:<password>] [-query:<WQL query>] [-authlevel:0..6]
Examples:
>wmiexplorer.exe "-host:primarywebserv" "-namespace:root\cimv2" "-user:admin" "-pswd:secret words"
>wmiexplorer.exe "-query: select * from Win32_Process"
**
Note: WMI namespace is a container grouping child objects related to one another in some way.
A namespace contains a hierarchy of classes and associations which define either a machine's object or the relationship between two or more objects.
The most commonly used namespace is CIMV2 (Common Information Model Version 2.)
See also: "Known problems"
System requirements
The following versions of Windows do have the WMI pre-installed:
- Windows Server 2022
- Windows Server 2019
- Windows Server 2016
- Windows Server 2012
- Windows Server 2008
- Windows Server 2003
- Windows 7, 8, 10, 11
- Windows Vista
- Windows 2000
- Windows XP
These versions of Windows do not have the WMI pre-installed:
- Windows NT
- Windows 98
- Windows 95
The WMI Core software package for Windows 95, 98, and Windows NT 4.0 available at Microsoft's web site.
Please note: WMI CORE for Windows 95/98/NT requires Microsoft Internet Explorer version 5 or later.
Known problems
OS: Windows XP SP2
Problem: built-in firewall may block WMI requests from remote systems
In order to remotely administer a Windows XP SP2 machine using WMI, you will need to configure the built-in firewall.
If the Windows firewall is enabled and if it hasn't been configured to accept a WMI connection, WMI Explorer (and HostMonitor) will not be able to connect to the system.
In such case, HostMonitor shows "The RPC Server is unavailable" error.
To configure Windows XP firewall to accept WMI connections, you need to enable the "Allow remote administration exception" group policy entry.
This setting can either be configured on the local group policy of a machine or globally by configuring the global Group Policy settings of an Active Directory domain.
OS: Windows 95/98/NT
Problem: winmgmt.exe does not start automatically on such systems
If you want to monitor Windows 95/98/NT systems using WMI, you should install WMI Core software package AND perform following steps:
- enable DICOM (set HKLM\SOFTWARE\Microsoft\OLE\EnableDCOM to "Y")
- enable remote connections (set HKLM\SOFTWARE\Microsoft\OLE\EnableRemoteConnect to "Y")
- set HKLM\SOFTWARE\Microsoft\WBEM\CIMOM\AutoStartWin9x to 2
- add link to the Winmgmt.exe file into the Startup directory
OS: Windows 2000,XP,2003
Problem: WMI Explorer (and HostMonitor's WMI test) returns "Class ISWbemLocator is not registered" error
Windows 2000, XP, 2003 do have the WMI pre-installed. If application returns such error, most likely there is system registry problem.
The following article shows how to fix a corrupted WMI repository and how to register the WMI components:
Rebuilding the WMI Repository
Other useful links:
How much does it cost?
When you purchase an Advanced Host Monitor you will get the license for WMI Explorer at no additional cost.
Advanced Host Monitor package is available in several licensing options: Starter ($199), Professional ($350), Advanced ($599), Enterprise ($1299) and LTS (Enterprise with LongTermSupport: $2499).
You can order by credit card, Switch and Solo debit cards, check/money order or wire transfer order.
Details..
|


